How to Cook Chicken Breast on the Stove (so it doesn't dry out)
Cook boneless, skinless chicken breast on the stove with the right techniques to get tender, juicy, tasty meat. Learn 7 easy steps to prevent your chicken breast from drying out in the pan.
Ingredients
- 2 Boneless skinless chicken breasts
Instructions
Step 1: TEMPER
- REMOVE the chicken breast from the refrigerator.
- TAKE OFF any plastic or wrappings and set the chicken on a plate on the counter away from direct sunlight.
- KEEP the chicken breast on the counter for 15 to 20 minutes, depending on the thickness of the meat, to warm it up close to room temperature.
- If the chicken breasts are thick, SLICE them in half horizontally. Hold a sharp chef knife in one hand and place your other hand on top of the chicken breast to steady it. The chicken breast will likely be thicker on one end and thinner on the other end. Start slicing at the thick end. When you cut the chicken horizontally, you will be able to open it, like a book. You can leave the chicken attached for a large piece or cut it apart for two pieces.
Step 2: TENDERIZE
- PLACE the chicken breast in the center of a zip top bag. Press out the air and zip the bag closed. Allow enough space for the chicken to expand as you pound it. If the chicken piece is too large, cut it in half and tenderize each piece separately. If you prefer to use parchment paper, place one piece of paper on the cutting board first. Then place the chicken on the parchment paper and finally cover the chicken with a second sheet of parchment paper.
- POUND the chicken with the meat tenderizer. Use soft taps so you don’t tear the chicken. Start in the center, or thickest part of the chicken and work toward the edges. The chicken will spread and thin out.
- CONTINUE to pound the chicken breast until the whole breast is the same width, about ½ to ¼ inches thick.
Step 3: SEASON
- PAT the moisture off the chicken breast with a paper towel.
- SALT the chicken. Pinch some salt with your fingers. Holding the salt 6 to 8 inches above the chicken, sprinkle it evenly over the breast. Turn the meat over and repeat salting on the other side.
- SEASON with other herbs or spices, if desired.
Step 4: PREHEAT GRILL PAN OR SKILLET
- PLACE a grill pan or skillet on a burner on the stove.
- TURN on the stove to medium high heat.
- HEAT the pan for about 10 minutes, or until a few drops of water sprinkled on the surface of the pan hiss, skitter, and evaporate.
- ADD 1 tablespoon of oil to the pan to prevent the chicken from sticking, if desired. Or you can brush the chicken with a small amount of melted butter. This step is optional. If the grill pan is hot enough, the chicken should not stick to it, even without oil.
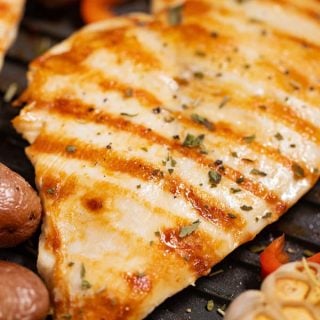
Step 5: SEAR and COOK but DON'T OVERCOOK
- SEAR the chicken by placing it on the pan's hot surface. If you are adding more than one breast at a time, make sure each piece is at least one inch apart.
- COOK the chicken without touching it for 3 to 4 minutes.
- FLIP the chicken over. Try to place it on a hot part of the pan if possible (rather than where it was just cooking).
- COOK an additional 3 to 4 minutes.
- TAKE the temperature of the chicken at the thickest spot. Use a meat thermometer. Don't guess the temperature.
- REMOVE the pan from the heat when the chicken reaches an internal temperature of 155° F at the thickest part of the meat. Keep the chicken at 155° F for 55 seconds. The chicken should easily remain at this temperature in the hot pan, off the heat.
Step 6: REST
- REMOVE the chicken from the pan after its internal temperature has been 155° F for 55 seconds. Place the chicken on a cutting board.
- REST the chicken on a cutting board for about 5 minutes to let muscle fibers relax and juices redistribute. During this time the chicken will cool down about 5° F.
- SALT to taste if desired. Taste before salting. It may not need any more salt.
Step 7: CUT AGAINST THE GRAIN
- FIND the direction of the grain. The grain is the muscle fibers in the chicken. It looks similar to the grain of wood.
- CUT the chicken at an angle against the direction the grain runs. This will shorten the muscle fibers, leading to a tender bite.
- SERVE or use cooked chicken in another recipe.
STORE IN REFRIGERATOR or FREEZER
- PLACE leftovers in an airtight container and store in the refrigerator for up to 3 days or place in a freezer container and freeze in the freezer for up to 6 months.
Notes
All images and content are © TheTastyTip.com. If you want to use this recipe and techniques, please take your own photos, write your own description, and link back to this page. Thank you.
Nutrition
Serving: 1gCalories: 99kcalProtein: 19gFat: 2gSaturated Fat: 1gPolyunsaturated Fat: 1gCholesterol: 51mgSodium: 44mg
Tried this recipe?Let us know how it was!