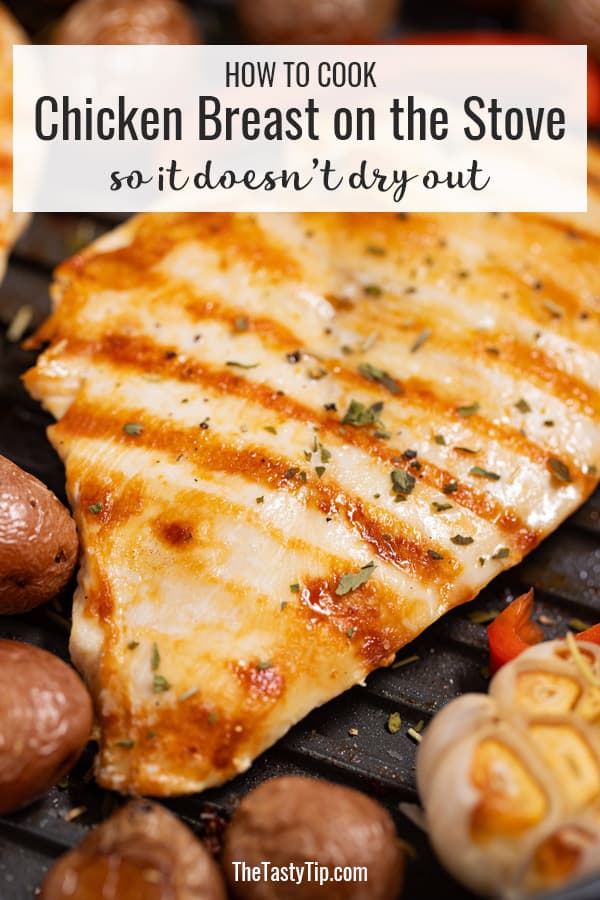
Discover how to cook chicken breast on the stove top for tender, juicy, tasty meat. Learn 7 easy steps to prevent your chicken breast from drying out in the pan.
Are you tired of dry rubbery chicken breasts? Do you long for a simple chicken recipe that will yield a juicy chicken breast? You just want flavorful chicken that is a blank slate for any chicken recipe. Is that too much to ask?
No, my friend. It is a reasonable desire and totally achievable. The best way to get the result you want is to learn a few techniques. You can apply these techniques to a variety of cooking methods. But this article focuses on cooking boneless skinless chicken breast on the stove top.
The best way to cook chicken breast on the stove so it does not dry out is to follow seven crucial steps.
- Temper
- Tenderize
- Season
- Preheat pan
- Don’t overcook
- Rest
- Cut against the grain
I follow these 7 steps every time I cook boneless skinless chicken breast on the stove top. These techniques have never failed me. Every single time I follow this 7-step plan, the results are juicy chicken breast perfection — golden brown, moist, juicy, flavorful, scrumptious.
But that is not how my story started.
Afraid of under-cooked meat, I always used to cook chicken too long. Dry, overcooked, rubbery chicken. That was my normal. However, that changed after a horrible dinner party.
I ran into an old friend and spontaneously invited her family over for dinner.
Grilled chicken was on the menu, so I threw the meat on the heat with a little seasoning and set the timer.
When the timer went off, our guests hadn’t arrived yet. So I turned off the heat, but kept the meat in the pan. Mistake!!!
By the time my friends arrived, the chicken was overcooked and dry. Though self-conscious about the unappetizing meal, I had no backup plan.
At dinner we all looked at the chicken dubiously. Everyone reassured me it was fine to serve, so I did.
My family, accustomed to eating my mistakes, powered on. My friend’s husband politely ate the chicken, but not my friend. She did not touch it, not even feigning interest.
I was embarrassed and never saw her again. My chicken cooking disaster ruined what could have been a nice reunion.
I committed to never let poorly cooked food ruin a friendship again. I was determined to master the skill of cooking chicken on the stove. That led to research and experimentation, plus a ton of trial and error.
But the effort paid off. I discovered a method that works every time. And I want to share what I learned with you.
Step 1: Temper the Chicken Breast
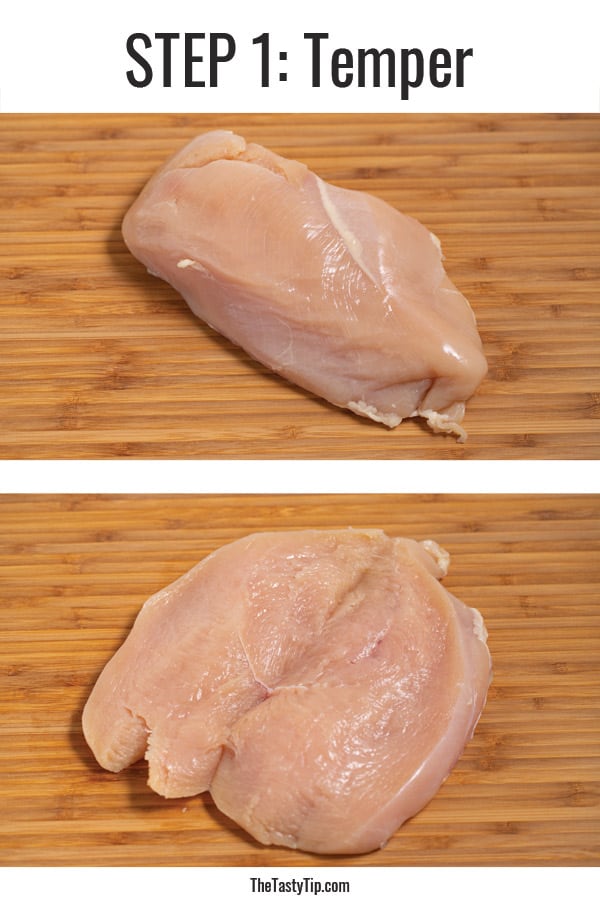
Have you heard the term “temper”, in reference to meat? It was a new concept for me.
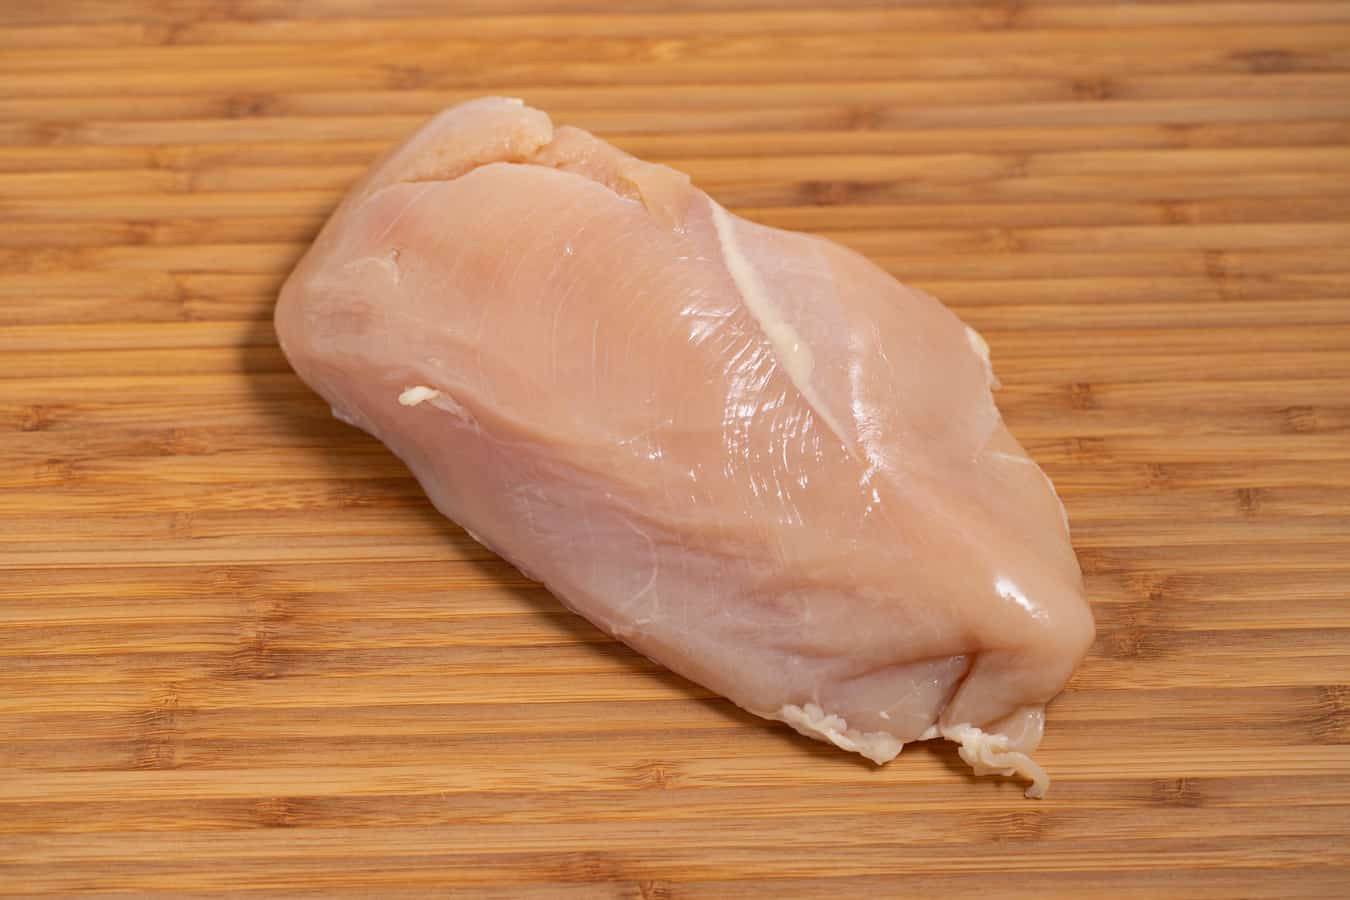
To temper meat means to bring it closer to room temperature before cooking it. Refrigerated chicken breast is about 40° F straight out of the refrigerator. Room temperature is generally 65-68° F.
It can be intimidating to let raw chicken sit on the counter. I agree. However, as long as you keep the chicken on a separate plate away from other ingredients and you temper only until the chicken reaches room temperature, you will be fine.
Raw chicken is not the problem. Cross-contamination is the problem.
The results of tempering will be worth the uneasiness you may feel seeing raw chicken on the counter for a few minutes. Tempered chicken sears and caramelizes beautifully. It takes less time to cook and it cooks more evenly.
Cold chicken placed in a hot pan, cools the pan and results in an inconsistent sear, and slower, uneven cooking. The chicken may end up tasting rubbery. To solve this problem, temper the chicken before cooking AND preheat your grill pan.
How to Temper Chicken Breast
- Remove the chicken breast from the refrigerator.
- Take off any plastic or wrappings and set the chicken on a plate on the counter away from direct sunlight. The chicken will be about 40° F.
- Let the chicken breast sit on the counter for 15 to 20 minutes, depending on the thickness of the meat. During this time, the chicken will warm up, about 10° F.
- Butterfly the breasts if they are thick. (See note below.)
Note: If your chicken is quite thick, butterfly it. What does it mean to butterfly chicken breasts? To butterfly chicken, slice the chicken in half horizontally.
Thinner chicken will warm up quickly and cook evenly and rapidly.
How to Butterfly Chicken
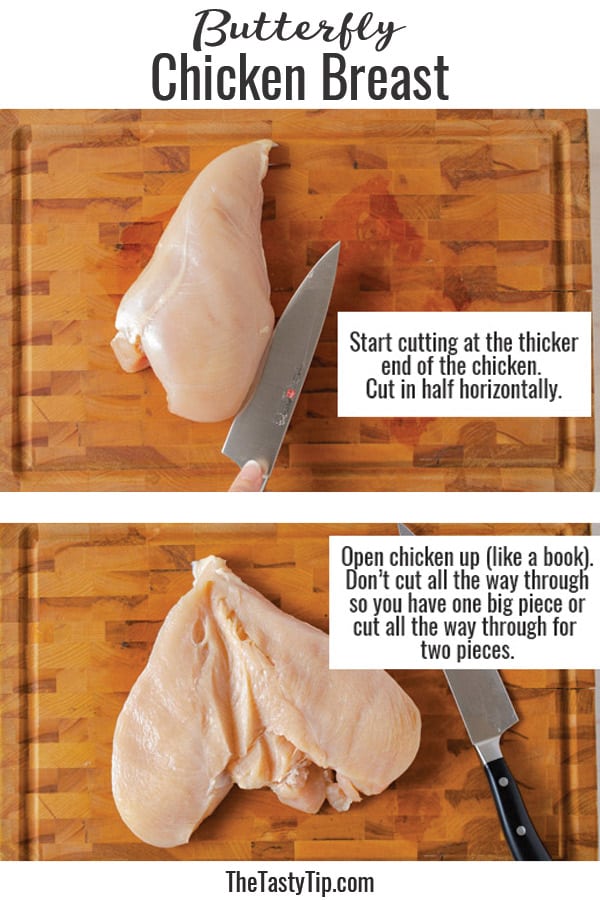
- Hold a sharp chef knife in one hand and place your other hand on top of the chicken breast to steady it. The chicken breast will likely be thicker on one end and thinner on the other end.
- Start slicing at the thick end. When you cut the chicken horizontally, you will be able to open it, like a book. You can leave the chicken attached for a large piece or cut it apart for two pieces. (I usually prefer to cut it apart for two pieces.)
After tempering, butterflying, and tenderizing your chicken, take its temperature again. You will find the temperature is now about 60-65° F, much closer to room temperature.
Please note: It will take longer to temper chicken in the winter (with a cold kitchen) than it will in the summer (with a warmer kitchen).
Step 2: Tenderize Chicken
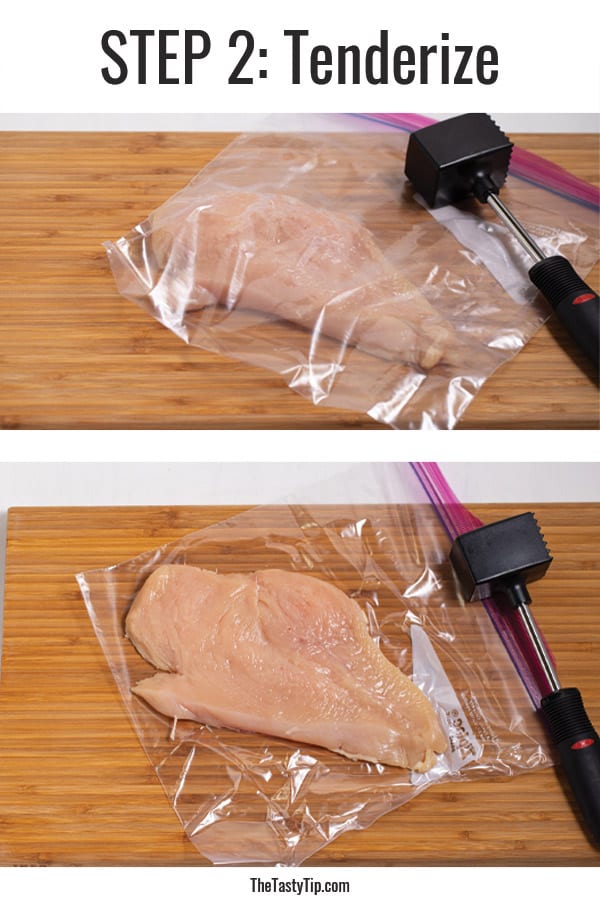
Pounding the chicken breaks down tough meat fibers, which tenderizes and softens the meat. The chicken remains juicy, cooking time shortens, and the chicken cooks evenly.
You will need a meat mallet (tenderizer) or rolling pin (not as efficient).
Use a zip top bag or parchment paper to keep the chicken juices from flying all over the kitchen.
How to Tenderize Chicken Breast
- Place chicken breasts in a single layer in the center of a zip top bag. Press out the air and zip the bag closed. There should be plenty of space for the chicken to expand as you pound it. If the chicken piece is too large, cut it in half and tenderize each piece separately.
If you prefer to use parchment paper, place one piece of paper on the cutting board first. Then place the chicken on the parchment paper and finally cover the chicken with a second sheet of parchment paper.
- Pound the chicken with the meat mallet. Use soft taps so you don't tear the chicken. Start in the center at the thickest part of the breast and work toward the edges. The chicken will spread and thin out.
- Continue to pound the chicken breast until the whole breast is the same width, about ½ to ¼ inches thick.
Step 3: Season Chicken
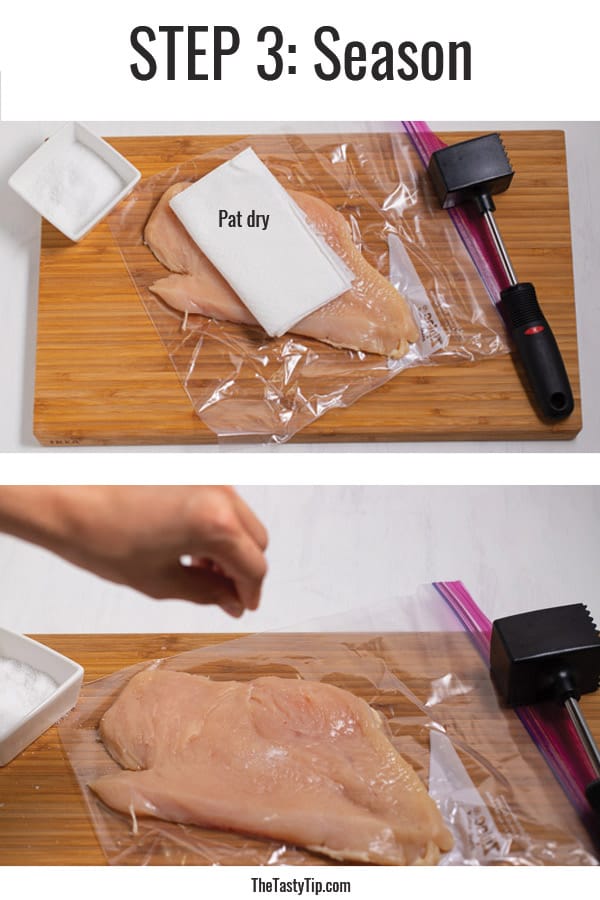
Salt both sides of the chicken breast before placing it in the hot pan. You may also want to salt it a final time just before serving it as well. Although a variety of herbs and spices can season chicken, salt is the key to flavor.
It is hard to make up for flavor if you fail to salt the chicken before you cook it. I prefer a simple recipe with only Kosher salt. Try it the first time with salt only.
Then next time, in addition to salt, try seasoning with homemade Montreal steak seasoning, black pepper, garlic powder, Italian seasoning, or fresh herbs.
How to Season Chicken Breast
- Pat the moisture off the chicken breast with a paper towel.
- Salt both sides of the chicken. The easiest way to do this is to pinch some kosher salt with your fingers. Holding the salt 6 to 8 inches above the chicken, sprinkle it evenly over the breast.
- After the chicken is cooked, it has rested (see resting info below), and you are ready to serve it, lightly sprinkle salt on it again to taste.
Step 4: Preheat Pan
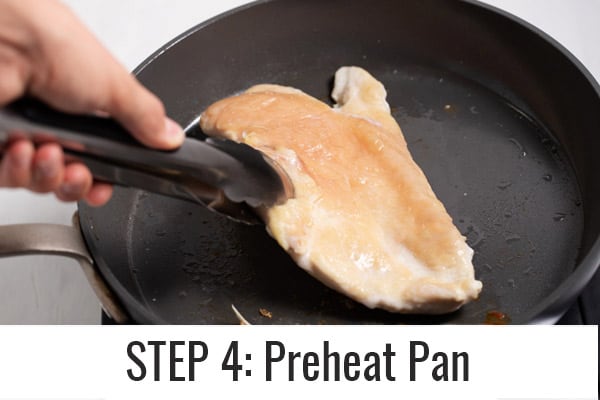
Preheat a grill pan or a skillet over medium-high heat. The only way a tempered chicken breast will sear is if it is placed in a preheated pan.
When chicken sears, a chemical reaction, called the Maillard reaction occurs. This reaction causes meat to brown and form a crust, which in turn increases savoriness and depth of flavor.
But searing can only happen when the pan is hot before adding the meat. Maillard reactions require a high-heat cooking method. So heat up that grill pan.
Add a small amount of olive oil to a large skillet or brush the chicken breast with butter. The hot pan and the fat will help prevent the meat from sticking to the pan.
Depending on the size of your pan, add one or two pieces of chicken. Place chicken breasts in a single layer in the pan.
Keep one inch between each chicken breast. This prevents the meat from steaming and helps it form a savory crust.
After placing the chicken in the pan, do not touch it for 3 minutes. Just let it sear.
When you flip the first side over, it will come up easily from the pan if it has seared properly. If it is sticking, it hasn’t cooked long enough or your pan was not hot enough.
If you want more flavoring than salt alone, now is the time to add the seasoning. Sprinkle with black pepper, garlic powder, or fresh herbs.
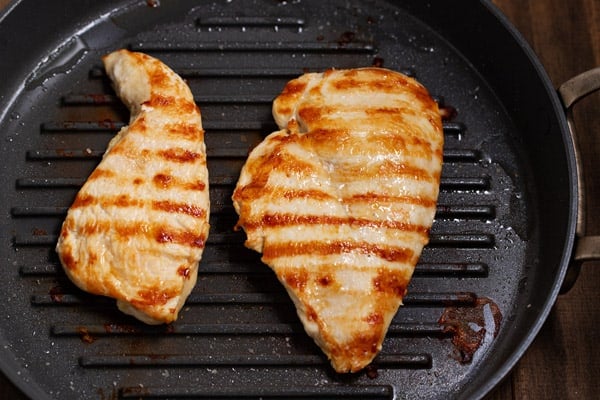
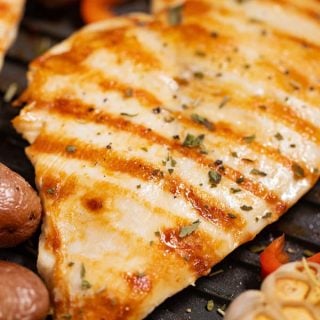
A note on the best pans for cooking chicken. A grill pan is my favorite pan to cook chicken on the stove because it leaves grill marks on the cooked chicken.
However, a cast iron pan or non stick skillets are great too. Use what you have.
Step 5: Don’t Overcook Chicken
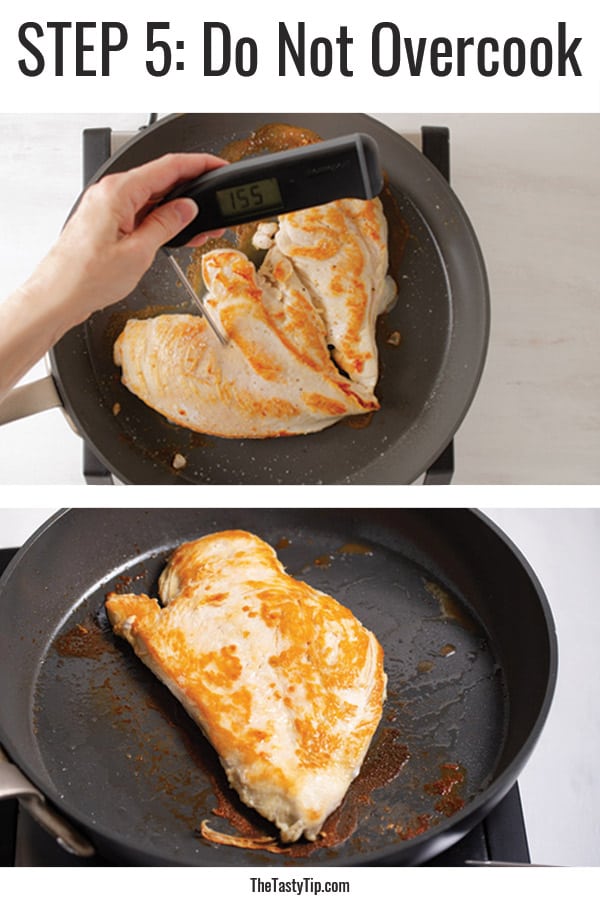
Overcooking chicken has always been my biggest challenge. Concerned with food safety, I overcompensate by cooking it too long. The result is dry rubbery chicken breasts.
Wonder what temperature to cook chicken safely to? I did too, so I looked it up.
The Food and Drug Administration recommends cooking chicken to an internal temperature of 165° F. Any salmonella present in the chicken will not survive when chicken is held at 165° F for about 10 seconds.
However, chicken breast cooked to 165° F can be dry and lacking flavor. So what can be done? Can you make safe chicken full of flavor? Absolutely!
The USDA Food Safety and Inspection Service provides guidelines for safely cooking meat to a lower temperature (to retain moisture and flavor).
The length of time the chicken remains at a particular temperature is the technique that balances flavor with safety.
Cooking chicken to a lower temperature and holding it at that low temperature for an appropriate length of time safely cooks the chicken.
Time + Temperature = Safely Cooked Chicken
If you are interested, check out the time-temperature chart for safely cooking chicken issued by the Food Safety and Inspection Service.
For example, cooking chicken to 160°F and holding it at that temperature for 17 seconds safely cooks the chicken.
Holding the chicken at 155°F for 55 seconds will give you the same result.
The key here is that every part of the chicken (especially the thickest part of the breast) must remain at the desired temperature for the correct length of time. This is why pounding the chicken breast until it is all the same thickness is so important.
Chefs at top notch restaurants NEVER grill their chicken until it reaches 165°F. They know that if they do the chicken will be overcooked and dry. So ask them. I dare you to find me one upscale restaurant that grills their chicken to 165°F.
Follow the advice of the experts.
Remember, Time + Temperature = Safely Cooked Chicken.
I have found the best way to get flavorful chicken is to cook it to and internal temperature of 155°F and then hold it there for 55 seconds.
Pull the chicken off the heat when it reaches 155°F and let it rest (see next step) at that temperature for 55 seconds and you will never make overcooked chicken again.
But remember, take the temperature at the thickest part of the chicken breast.
So how do you know what your chicken’s temperature is? Unfortunately, you cannot guess the temperature of meat by appearance. You must use a meat thermometer. It is an investment that is well worth the price.
My favorite thermometer is the instant read Thermopen. But there are several meat thermometers on the market.
Wonder how long to cook chicken breast on the stove top to achieve the right internal temperature? The answer depends on three factors.
- Whether the pan is preheated
- Temperature of the chicken when it goes into the pan
- Thickness of the chicken breast
IF the pan is preheated AND the chicken is tempered (to room temperature) AND the meat is ¼ inches thick, the cook time is 3 to 4 minutes per side. Cook 3 to 4 minutes on one side and then flip it over and cook it 3 to 4 minutes on the other side. Total time is 6 to 8 minutes.
Next, pull out your thermometer and check the temperature of the chicken.
No matter what a recipe says, use your judgment and thermometer to determine when the chicken has finished cooking.
Step 6: Rest Chicken
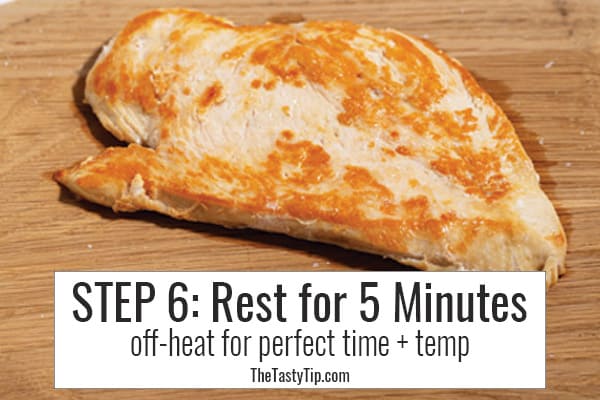
After the chicken has finished cooking, rest the chicken before you cut or serve it.
When you rest the chicken, the natural juices redistribute in the chicken, resulting in more flavor.
Resting also allows the chicken to finish cooking with residual heat. This is sometimes referred to as carryover cooking.
How to Rest Chicken
- After the chicken has cooked, remove the pan from the heat. Let the chicken remain in the hot pan, to keep the desired temperature for the right amount of time. I like to keep my chicken 155°F for 55 seconds.
- Next, remove the chicken from the hot pan so it does not continue to cook.
- Rest the chicken on a cutting board for about 5 minutes to let muscle fibers relax and juices redistribute. During this time the chicken will cool down about 5°F.
According to The Food Lab by Lopez-Alt, chicken should rest until it is 5° cooler than its fully cooked temperature. This allows the muscle fibers to relax and the chicken juice to thicken. At this point the chicken won’t lose juice anymore.
It is now ready to cut and serve.
Step 7: Cut the Chicken Against the Grain
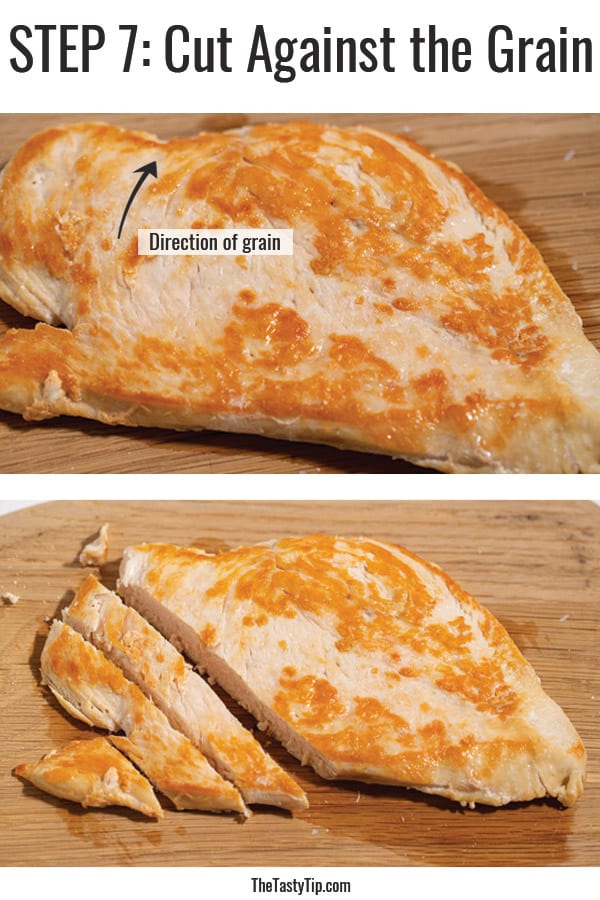
Do you know how to cut chicken breast? Always cut against the grain to get especially tender chicken breasts. What does this mean?
Chicken is made up of long muscle fibers. These muscle fibers are what is referred to as the grain. You can see the grain on a piece of chicken just like you can see the grain in a piece of wood.
Muscle fiber is tough. Chicken cut in the direction of the grain keeps tough muscle fibers whole. You are eating those tough pieces of meat.
So even if you have followed all my steps to cook chicken breast perfectly, you can still wind up with tough meat if you do not cut it correctly.
To get a tender mouthful with every bite, cut the chicken against the grain. When you cut against the grain, you get short muscle fibers. This translates to tender meat. Yum!
The way you cut your chicken is just as important as how you cook the chicken.
How to Cook Chicken Breast on the Stove When You Have Several Pieces
After you have cooked your first pan of chicken on the stove, you may still have another batch to cook. Clean the chicken scraps out of the pan before you add more chicken. Otherwise, the scraps could scorch, affecting the current batch of chicken in the pan.
After you clean the scraps out, heat the pan again so you get a nice sear. Coat the pan with a small amount of oil or butter, if desired.
Keep the scraps if you plan on making a pan sauce. Just add it back to the cooking liquid when making the sauce.
How to Serve Cooked Chicken
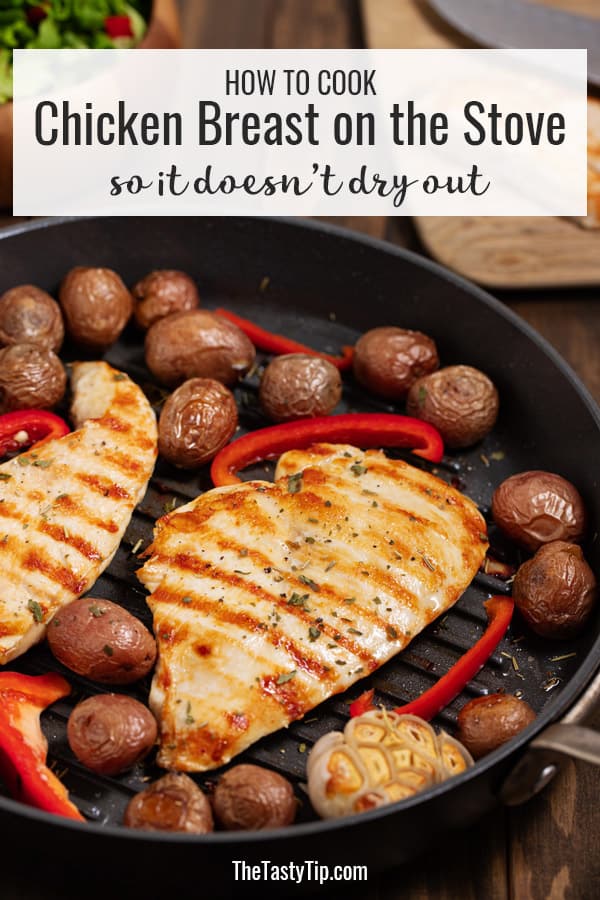
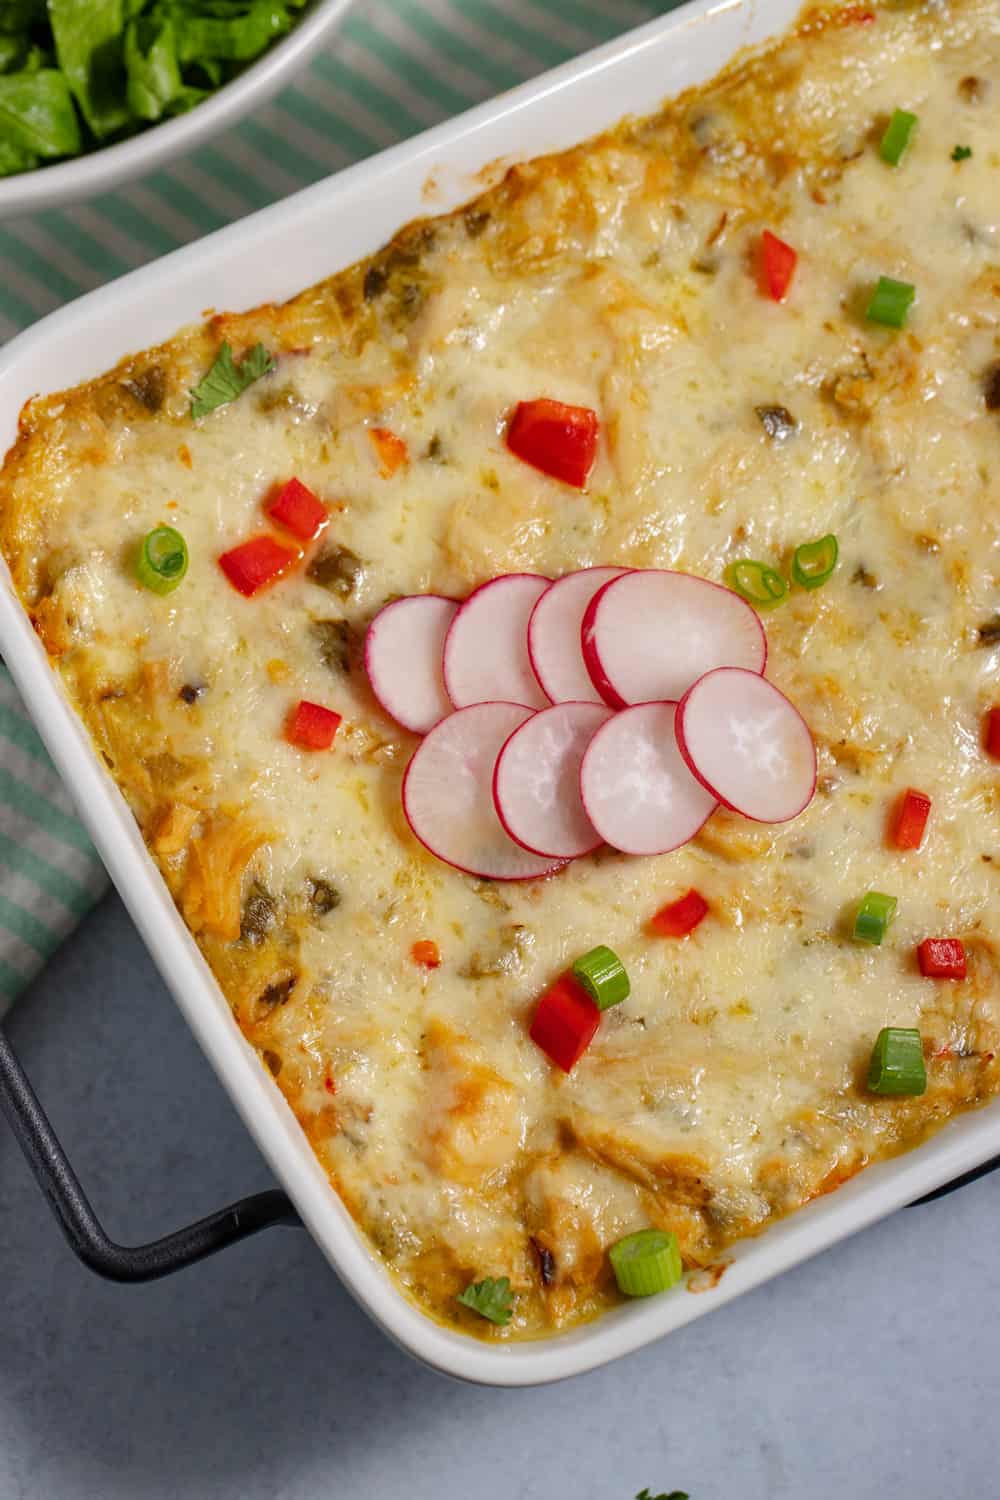
Lightly seasoned chicken breast is a blank slate for a variety of recipes. After cutting the chicken breast, serve it on top of a Cobb salad, in green chili enchiladas, salsa verde chicken chili, chicken enchiladas with sour cream sauce, or a taco chicken salad.
How to Store Chicken Breast
If you have leftover chicken, store it correctly so you can safely eat the leftovers.
How to Store Cooked Chicken Breast in the Refrigerator
- Cool the chicken close to room temperature (between 65-68° F). This shouldn’t take long after removing the chicken from the heat.
The US Food Safety website teaches to refrigerate perishable food within two hours. In my opinion, two hours is a long time for food to be out -- especially meat.
So just cool the chicken down, so it isn’t piping hot. Or finish your meal and then put it away.
- Place the chicken in an airtight container.
- Store the chicken in the refrigerator for 2 to 3 days. This is how long you can keep cooked chicken breast in the refrigerator without fear of spoiling.
How to Store Cooked Chicken Breast in the Freezer
- Cool the chicken close to room temperature (between 65-68° F). This shouldn’t take long after removing the chicken from the heat.
- Place the chicken in a single layer in a freezer container or a freezer zip top bag. Store up to 6 months. For the best taste, I recommend eating it within 3 months.
How to Reheat Cooked Chicken Breast
If the cooked chicken has been in the freezer, place it in the refrigerator to thaw overnight.
Reheat refrigerated chicken low and slow. Cooked chicken breast tends to dry out, so add moisture to compensate.
- Place a small amount of chicken broth or water (a couple of tablespoons) in the grill pan or large skillet. The amount you add depends on the amount of chicken you will be reheating. Add the chicken.
- Reheat on medium heat for 10 to 15 minutes.
- Flip the chicken over and continue heating until the meat is hot.
You can also microwave the chicken to reheat.
- Place the chicken in a shallow bowl and add ½ tablespoon of chicken broth or water. Cover the dish with a wet paper towel.
- Microwave for 20 second intervals.
- Turn the chicken and microwave for another 20 seconds.
- Check and repeat until the chicken is hot.
Chicken can be used in unlimited recipes. Learning how to cook chicken breast on the stove to perfection is one of the best cooking skills you can master. Then you can have as many dinner parties as you want with long lost friends.
Recipe
How to Cook Chicken Breast on the Stove (so it doesn't dry out)
Ingredients
- 2 Boneless skinless chicken breasts
Instructions
Step 1: TEMPER
- REMOVE the chicken breast from the refrigerator.
- TAKE OFF any plastic or wrappings and set the chicken on a plate on the counter away from direct sunlight.
- KEEP the chicken breast on the counter for 15 to 20 minutes, depending on the thickness of the meat, to warm it up close to room temperature.
- If the chicken breasts are thick, SLICE them in half horizontally. Hold a sharp chef knife in one hand and place your other hand on top of the chicken breast to steady it. The chicken breast will likely be thicker on one end and thinner on the other end. Start slicing at the thick end. When you cut the chicken horizontally, you will be able to open it, like a book. You can leave the chicken attached for a large piece or cut it apart for two pieces.
Step 2: TENDERIZE
- PLACE the chicken breast in the center of a zip top bag. Press out the air and zip the bag closed. Allow enough space for the chicken to expand as you pound it. If the chicken piece is too large, cut it in half and tenderize each piece separately. If you prefer to use parchment paper, place one piece of paper on the cutting board first. Then place the chicken on the parchment paper and finally cover the chicken with a second sheet of parchment paper.
- POUND the chicken with the meat tenderizer. Use soft taps so you don’t tear the chicken. Start in the center, or thickest part of the chicken and work toward the edges. The chicken will spread and thin out.
- CONTINUE to pound the chicken breast until the whole breast is the same width, about ½ to ¼ inches thick.
Step 3: SEASON
- PAT the moisture off the chicken breast with a paper towel.
- SALT the chicken. Pinch some salt with your fingers. Holding the salt 6 to 8 inches above the chicken, sprinkle it evenly over the breast. Turn the meat over and repeat salting on the other side.
- SEASON with other herbs or spices, if desired.
Step 4: PREHEAT GRILL PAN OR SKILLET
- PLACE a grill pan or skillet on a burner on the stove.
- TURN on the stove to medium high heat.
- HEAT the pan for about 10 minutes, or until a few drops of water sprinkled on the surface of the pan hiss, skitter, and evaporate.
- ADD 1 tablespoon of oil to the pan to prevent the chicken from sticking, if desired. Or you can brush the chicken with a small amount of melted butter. This step is optional. If the grill pan is hot enough, the chicken should not stick to it, even without oil.
Step 5: SEAR and COOK but DON'T OVERCOOK
- SEAR the chicken by placing it on the pan's hot surface. If you are adding more than one breast at a time, make sure each piece is at least one inch apart.
- COOK the chicken without touching it for 3 to 4 minutes.
- FLIP the chicken over. Try to place it on a hot part of the pan if possible (rather than where it was just cooking).
- COOK an additional 3 to 4 minutes.
- TAKE the temperature of the chicken at the thickest spot. Use a meat thermometer. Don't guess the temperature.
- REMOVE the pan from the heat when the chicken reaches an internal temperature of 155° F at the thickest part of the meat. Keep the chicken at 155° F for 55 seconds. The chicken should easily remain at this temperature in the hot pan, off the heat.
Step 6: REST
- REMOVE the chicken from the pan after its internal temperature has been 155° F for 55 seconds. Place the chicken on a cutting board.
- REST the chicken on a cutting board for about 5 minutes to let muscle fibers relax and juices redistribute. During this time the chicken will cool down about 5° F.
- SALT to taste if desired. Taste before salting. It may not need any more salt.
Step 7: CUT AGAINST THE GRAIN
- FIND the direction of the grain. The grain is the muscle fibers in the chicken. It looks similar to the grain of wood.
- CUT the chicken at an angle against the direction the grain runs. This will shorten the muscle fibers, leading to a tender bite.
- SERVE or use cooked chicken in another recipe.
STORE IN REFRIGERATOR or FREEZER
- PLACE leftovers in an airtight container and store in the refrigerator for up to 3 days or place in a freezer container and freeze in the freezer for up to 6 months.
Notes
Nutrition
Did you make this recipe? Tag @thetastytip on Instagram and hashtag it #thetastytip.
Did you like this post? Then let's be social. FOLLOW ME on INSTAGRAM and PINTEREST to keep up with the latest happenings.


Greta
I followed your directions for making chicken breasts on the stove top without drying out. It's the first time they've come out very moist and delicious! I really appreciate the easy, but thorough directions that you have written.
Best regards,
Greta