Discover how to calibrate an oven and why it is so important. When you learn your oven’s true temperature and find the oven hot spots, your baking will be more consistent and reliable.
Have you ever followed a baking recipe exactly, only to find that the food is not ready when the instructions say it should be?
You may find yourself mistrusting the recipe if it seems to take either a much shorter or much longer time for the baked item to be finished.
It can be so frustrating. I often found that many of the recipes I used were never done in the amount of time described in the recipe. I wasn’t quite sure why.
However, before you give up on a recipe, consider that your oven could be the source of the problem.
What Everyone Should Know About Their Oven
There are two pieces of information everyone should learn about their oven. And this knowledge DOES NOT come from reading your oven’s instruction manual.
- Your oven's true temperature (regardless of what the oven thermostat reads)
- Where the hot spots in your oven are
What is Your Oven's True Temperature?
As I tried to figure my baking problem, I learned that oven temperatures can be off by as much as 50° Fahrenheit.
That is wildly inaccurate.
There are a few reasons why the oven temperature is wrong.
Sometimes the problem is an old oven thermostat. Other times, it can be a leaky door seal.
Whatever the reason the temperature is off, it can create a headache for you as you bake.
If you routinely find baked items are either undercooked or overcooked, you may have an oven that does not heat to the proper temperature.
To solve this first problem, do a simple oven temperature calibration test. But before you do that, read on to find out about oven hot spots. As you calibrate your oven, you can discover your oven hot spots at the same time.
Where are Your Oven Hot Spots?
Maybe you have noticed that on the same baking sheet of cookies, some cookies are done while other cookies are dry and overdone or even burned.
This is very common because there are always hotter areas in your oven. Hotter areas will cook your food faster. These hotter areas are called hot spots.
Instead of struggling with your oven, learn how to calibrate it and find your hot spots so you get more accurate baking results every time.
Calibrating your oven is easy to do and will result in accurate and delicious baked goods. This is especially important when you are baking foods with quick baking times, such as cookies like Snickerdoodle cookies.
How an Oven Works
An electric oven consists of a metal box with a heating element on the top and on the bottom, a thermostat to measure the oven temperature, and control dials.
When you turn your oven on, the heating element on the bottom turns on unless you turn the oven to broil. The top heating element turns on when broil is selected. This heats food from the top.
The oven thermostat detects the temperature in the oven.
When the oven reaches the temperature you selected, the heating element turns off.
Then when the oven thermometer senses the oven temperature decreasing, the heating element will cycle back on to retain the temperature selected.
Some ovens preheat to a much higher temperature than the oven was set to in order to hold the desired temperature longer.
In our modern time, it always surprises me when I find something that cannot be set completely accurately. Maintaining the oven temperature is a series of cycles to add heat when the temperature goes down.
I like to think of it like a house heater. When you turn the heater on in your house, the house warms to the temperature set and then it cycles off. After a time when the thermostat registers a drop in the temperature, the heater will cycle back on.
This is what happens in your oven to maintain the set temperature.
So on to the instructions to calibrate your oven.
What You Need to Calibrate Your Oven
- Oven thermometer
There are models that are available for under $10.
I recommend the CND Pro Accurate Oven Thermometer. It can measure in both Fahrenheit and Celcius.
- 1 sheet of paper
On this sheet of paper, you will draw a simple map of your oven to you can mark the hot spots.
How to Calibrate Your Oven + Find Your Hot Spots
Calibrating your oven and finding the oven hot spots is easy to do, but it will take a little time. Fortunately, most of the time is hands-free, so you can do other things. Just set a timer, so you can write down the results at the correct time.
Please note: Your oven will immediately start to lose heat when you open the oven door, so be prepared to note the temperature on the thermometer within seconds, so you record the right temperature.
If you can read the oven thermometer with the oven door closed, do that for a more accurate reading. This may not be possible when the thermometer is in the back of the oven.
At a minimum, check the temperature at the following locations:
- Middle of the oven -- MOST IMPORTANT LOCATION -- this is where you always place the food to be cooked
- Back left hand side
- Back right hand side
To be even more accurate, also check the temperatures in these additional locations:
- Front left and right hand sides
- Optional: Middle right and left hand sides
Note that most pans aren’t big enough to stretch over the entire oven. However, knowing the hot and cold spots of your oven can help you know if your should rotate your pan during the baking time.
Now for the instructions.
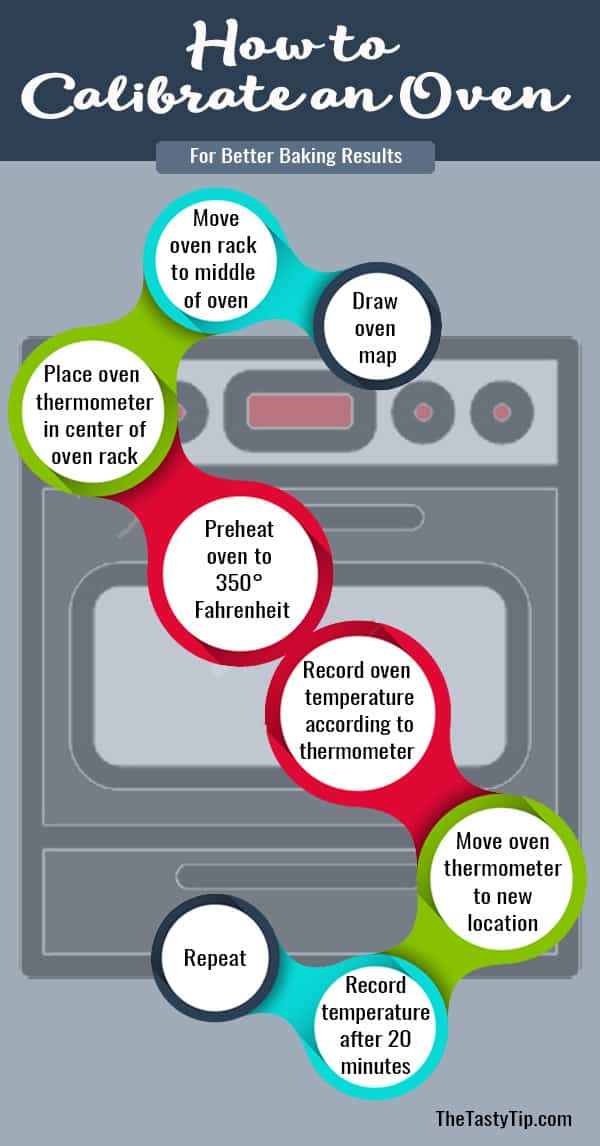
- Draw out a map of your oven. Just a large rectangle will do. This is where you will write down the temperature information on your map. Record temperatures on the 3 or 7 locations in your oven.
- Set the oven rack in the middle of the oven. For best results cook food in the middle of the oven for more even cooking.
- Place your oven thermometer in the center of the oven rack.
- Preheat oven to 350° Fahrenheit. Allow the oven to reach the temperature. Set the timer for 20 minutes after the oven registers 350° Fahrenheit.
- After 20 minutes, check the temperature of the oven thermometer and note it on your oven map. You should wait 20 minutes because most ovens do not actually reach the correct temperature when the oven registers it has preheated.
- Use tongs or a potholder to move the thermometer to the next location. Close the oven door and set the timer for 20 minutes.
- After 20 minutes check the temperature and write it down on your oven map.
- Continue to move the thermometer around the oven, wait for 20 minutes, and then check the temperature. Record the results on your oven map until you have checked all the oven spots.
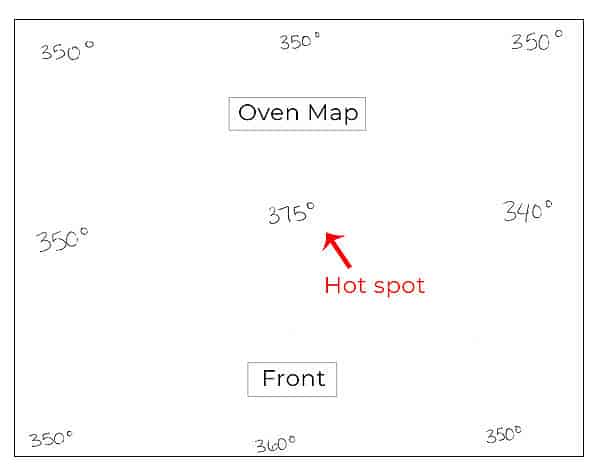
This is my oven's temperature map.
When you are finished, you will have a more accurate understanding of your oven and its hot spots and cold spots.
If you want to find out the temperature of your oven near the top or bottom of the oven, move the oven rack to lowest position.
Repeat the temperature recording process in all the locations.
Repeat this process with the oven rack in the highest position it can go.
This is an extra step that isn't necessary since most recipes call for baking your food in the center of the oven on the middle rack.
What To Do With All Your New Oven Information
When I checked the oven temperature, when the oven dinged (indicating it had reached the correct temperature), the oven temperature recorded only 300° Fahrenheit.
Because most ovens need more time to reach their true temperature, I waited 20 minutes to check the true temperature.
I found that my oven ran 25° hotter in the center of the oven. If I preheated the oven to 350° Fahrenheit, it actually heated to 375° Fahrenheit.
However, almost all of the other locations ran true to temperature or slightly above.
Surprisingly, my hot spot was the center of my oven.
To compensate for a hotter oven, I set my oven 25° Fahrenheit colder than the recipe calls for.
For example, if my recipe calls for an oven temperature of 350° Fahrenheit, I turn the oven on to 325° Fahrenheit.
When I started doing this, my baking accuracy improved.
Another Way to Find Your Hot Spots
Just knowing where your oven hot spots are may not seem relevant to you. However, another test can help you understand how hot spots are affecting your baking.
Preheat oven to 400° Fahrenheit and place slices of white bread on a large cookie sheet in the center of the oven. Bake for 10 minutes.
After 10 minutes, remove the pan and note the shade of brown each bread slice is. You will probably notice that the bread has toasted more if it was baked in your oven's hot spot.
Since you have already run the oven calibration test, you probably won’t be surprised that certain slices of bread are more toasted than others.
How to Deal With Hot Spots
The best way to bake, so that your oven hot spots don’t throw your recipe off, is to rotate the food partway through the baking cycle. Usually half way through is a good time to rotate.
This is a quick manual fix and it will help your baked items bake more evenly.
Please note: Whenever you open your oven, the temperature immediately starts to drop. So when you rotate your pan, do so as quickly as possible.
Monitor the food and be ready to increase the baking time by a minute or so to compensate for the loss of heat when the oven was opened.
Oven calibration, including finding your oven’s hot spots is The Tasty Tip of the day. I hope after you follow these instructions you are able to get perfect baking results.
How to Calibrate an Oven
Materials
- Oven thermometer
- 1 Sheet of paper
Instructions
- DRAW out a map of your oven. Just a large rectangle will do. This is where you will write down the temperature information on your map. Record temperatures on the 3 or 5 locations in your oven.
- SET the oven rack in the middle of the oven. For best results cook food in the middle of the oven for more even cooking.
- PLACE your oven thermometer in the center of the oven.
- PREHEAT oven to 350° Fahrenheit. Allow the oven to reach the temperature. Set the timer for 20 minutes after the oven registers 350° Fahrenheit.
- After 20 minutes, CHECK the temperature of the oven thermometer and note it on your oven map.
- MOVE the thermometer to the next location, using tongs or a potholder to prevent burns. Close the oven door and set the timer for 20 minutes.
- After 20 minutes RECORD the temperature on your oven map.
- CONTINUE to move the thermometer around the oven, wait for 20 minutes, and then check the temperature. Record the results on your oven map until you have checked all the oven spots.
Notes
Were you surprised with the results of your calibration test? Comment below and let me know how “off” your oven temperature was.


Comments
No Comments